Use One IP address For Websites Running on Many Servers
Reverse Proxy using Nginx
This tutorial will go through the steps of setting up three servers. One server that will direct internet traffic and two others that will host websites. All the websites will use one public IP address.
I made a YouTube video tutorial that follows this process here https://youtu.be/_jUYenP5T-M?si=BDcF3C3j5Pwcl3pg.
What is a Reverse Proxy Server
In my research I have found that reverse proxy server probably does more than what we need it to do for this tutorial.
Here is the best definition I have found:
A reverse proxy server is a type of server that sits in front of one or more web servers and web applications. It acts as an intermediary for requests from clients (such as web browsers) seeking resources from those servers. When a client makes a request, it is received by the reverse proxy, which then forwards it to the appropriate backend server.
-Source: ChatGPT
In our case the reverse proxy server is the server that gets traffic from the router (i.e. all the outside and beyond your network internet traffic) and it will direct the traffic to where it needs to go based on the domain that people on the outside use to access your network.
Here are a couple of diagrams to help convey the concept of what makes the reverse proxy server setup different than what is conventionally used or what I call the “Simple Setup”.
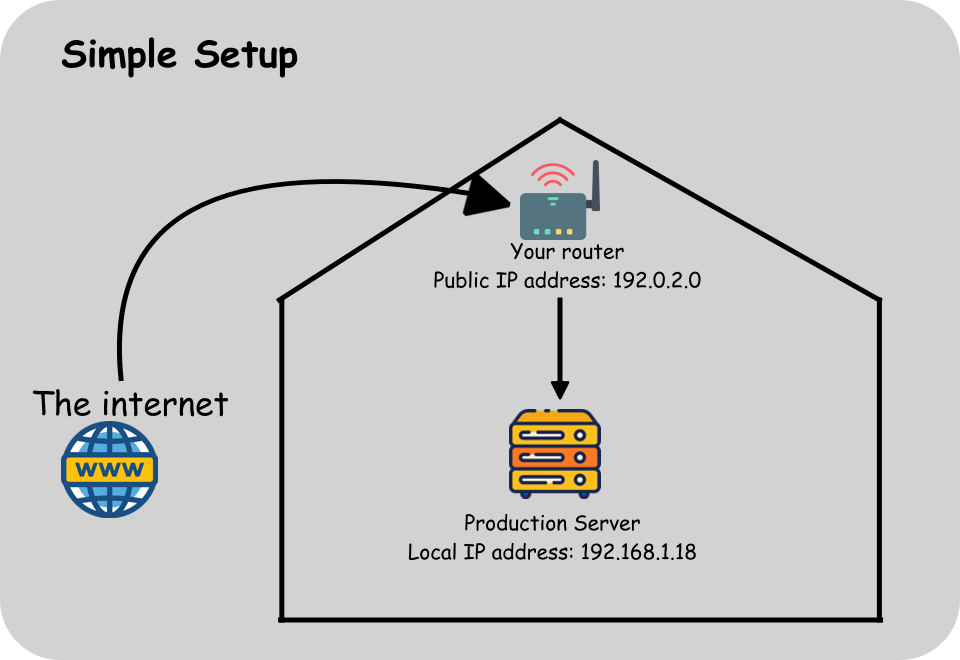 Illustration
1: Router to server hosting
web app setup
Illustration
1: Router to server hosting
web app setup
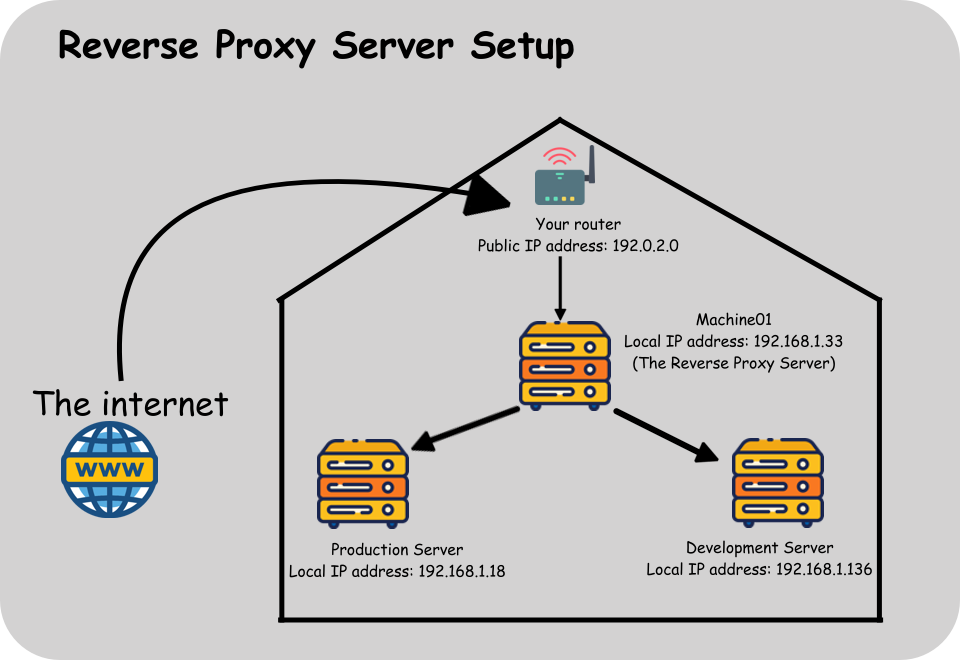 Illustration
2: Router to reverse proxy
server directing traffic to servers hosting apps
Illustration
2: Router to reverse proxy
server directing traffic to servers hosting apps
Credit icons used in diagrams:
https://www.flaticon.com/free-icons/wireless-router
https://www.flaticon.com/free-icons/server
https://www.flaticon.com/free-icons/www
Thank you flaticon.com!!!
Why you might want to do this?
You don’t want to spend high monthly web hosting fees
You have a good internet connection from your home or wherever you will store your servers.
You are willing to buy or have access to computing power.
My impetus for doing this
Specifically, for me, I am trying to build a health data platform. I have a suite of applications including a website and API that connect to the internet. I want to have a development server that I can test new code and process out like they were in production and I want to seem them working on the internet. So it is important for me to have two servers, one for a production machine and one for a development machine. AND I only have one IP address.
The reason one might want to do this is if you are running applications from your home. Also, if you think you can reduce costs by not having to pay for cloud servers. I think this is great for a small one mane start-up like myself.
Before getting started
I am using:
Ubuntu 20.04
VMWare (but you can use real or any other virtual machines, shouldn’t matter)
Nginx
Python
To follow along in this tutorial it will be best if you have three virtual or real machines. I will be using virtual machines using (VMWare). I do not think this will really matter. You’ll just need to access your machines.
Also, I use Ubuntu 20.04. You can download the Server ISO here (https://ubuntu.com/download/server).
If you just want to follow my example exactly, you can download my Python Flask app repositories here (https://github.com/costa-rica/ProductionWebApp.git).
Overview of our setup
To help understand the steps here is high level overview of what this setup will look like for this tutorial.
Public IP address: 192.0.2.0
Server 1
This will be the reverse proxy server
all router port forwarding will go to this machine
server name: Machine01
local IP address:192.168.1.133
machine name for Ubuntu: machine01
your name: dashanddata_name
username: dashanddata_user
password: pw_test
Server 2
server name: ProductionServer
local IP address:192.168.1.18
machine name for Ubuntu: productionserver
your name: dashanddata_name
username: dashanddata_user
password: pw_test
running app: ProductionWebApp
url for Machine02app: www.ProductionWebApp.dashanddata.com
Server 3
server name: DevelopmentServer
local IP address: 192.168.1.136
machine name for Ubuntu: developmentserver
your name: dashanddata_name
username: dashanddata_user
password: pw_test
running app: DevelopmentWebApp
url for Development app: www.DevelopmentWebApp.dashanddata.com
Step 1 Setup two hosting machines
Challenges in this section
Do you have the hardware for making different servers?
If you’ve never set up a server before you might want to see this video for setting up a Ubuntu server.
Establish SSH connection to access the terminal of your new server.
The step
For this tutorial I am going to use small hardware. I am using a virtual machine that has the following specs (for both the ProductionServer and DevelopmentServer):
CPU: 1
RAM: 4GB
Disk Space: 50GB
These will be small machines because they will just support a single Python Flask Application. I am going to call the machines ProductionServer and DevelopmentServer. I was going to call them Machine02 and Machine03, but then I thought maybe this will resonate more with others if I keep it closer to why I did this in the first place.
At at this point, I personally not only have a production and development server, but I have another server that I am using for my personal website and other apps. So you can use this for whatever you want and adding more servers isn’t much more work.
Here is a run-down of all the commands I use to prepare my Ubuntu server after it is running. You can use this as a checklist for yourself for things like did you install nignx, is the ufw open to the machine you need? Etc.,
sudo apt update
sudo apt install software-properties-common -y
sudo add-apt-repository ppa:deadsnakes/ppa -y
sudo apt-get install python3.11-full -y
sudo apt install nginx -y
install ufw and set up the rules
sudo ufw allow ssh
sudo ufw allow ‘Nginx full’
sudo ufw allow from 192.168.1.133 to any port 8000
sudo ufw enable
Note: you do not need to SSL secure from these machines - only the reverse proxy server. I usually “apt install certbot python3-certbot-nginx” for the public facing server, which at the end of the video will be the reverse proxy server. Therefore, I did not install certbot on these machines.
If you need help setting up an Ubuntu servers I have an article here (https://nick-rodriguez.info/blog/11) and here (https://www.youtube.com/watch?v=zoQbSfPkjRI) is a YouTube video that someone else made that I found extremely useful for making sure I use full hard drive size.
Step 2 Create nginx files for each hosting machine
Challenges in this section
Establish an SSH connection with the server and be able to move files from your workstation to servers hosting the apps.
Carefully type in the web address (it is cap sensitive and most likely the url in server_name should all be lower case)
Locating where to put the Nginx files.
if you’re using a Ubuntu Server operating system they go in /etc/nginx/conf.d/ or /etc/nginx/sites-availible/
Here is the ProductionServer’s ProductionWebApp .conf file:
server {
    listen       80;
    listen       [::]:80;
    server_name  www.productionwebapp.dashanddata.com;
    client_max_body_size 30G;

    location /static {
        alias /home/dashanddata_user/applications/ProductionWebApp/app_package/static;
    }

    location / {
        proxy_pass http://localhost:8000;
        include /etc/nginx/proxy_params;
        proxy_redirect off;
    }
}
Here is the DevelopmentServer’s DevelopmentWebApp .conf file:
server {
    listen       80;
    listen       [::]:80;
    server_name  www.developmentwebapp.dashanddata.com;
    client_max_body_size 30G;

    location /static {
        alias /home/dashanddata_user/applications/DevelopmentWebApp/app_package/static;
    }

    location / {
        proxy_pass http://localhost:8000;
        include /etc/nginx/proxy_params;
        proxy_redirect off;
    }
}
Move the files to the Server. Then save the files to the /etc/nginx/conf.d/
Here is what my terminal looks like to do this:
sudo mv ProductionWebApp.dashanddata.com.conf /etc/nginx/conf.d/
sudo nginx -t
sudo systemctl reload nginx
Step 3 Setup DNS for your domains
Challenges in this section
Find you public IP address
Get a domain name and setup A records with your public IP address
Accessing your router app to set up port forwarding rules
I use godaddy so here are screenshots of how I set up these app domain names.
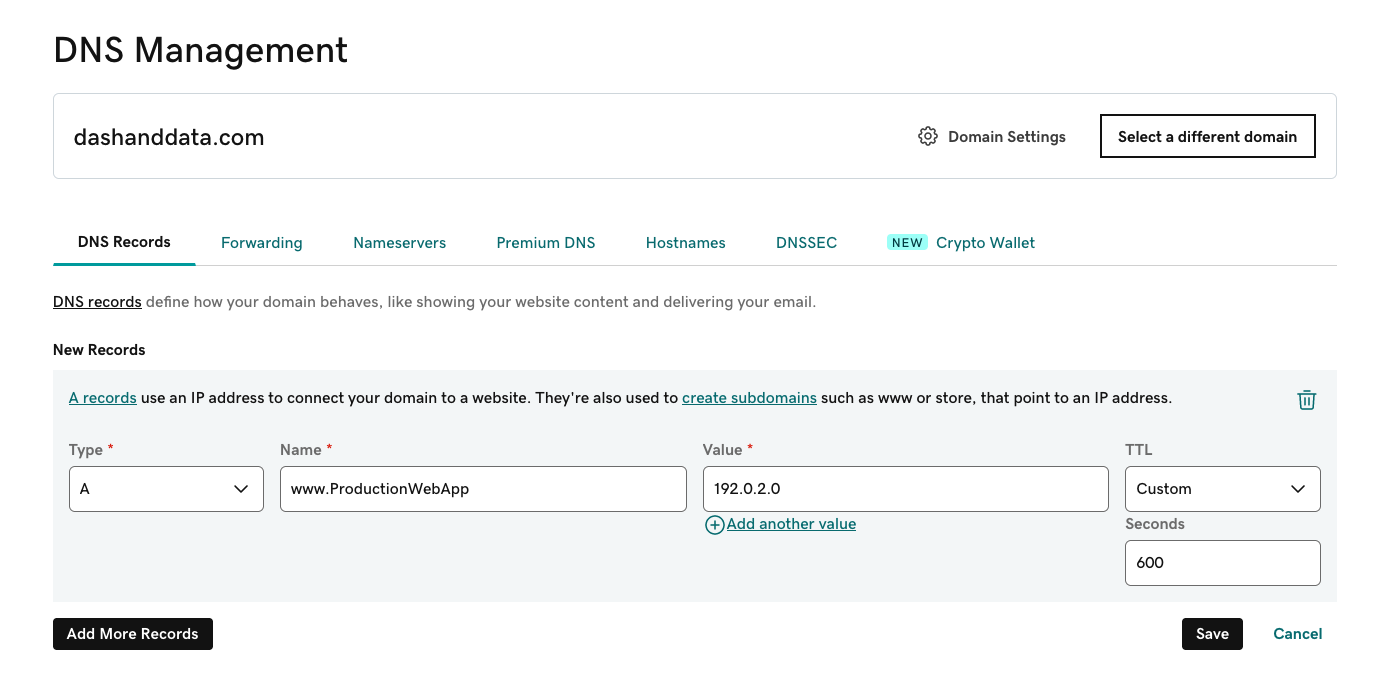
In the screenshot above I have used capital letters for www.ProductionWebApp. However, I after I pressed “Save” they turned to lower cases so you will see in my Nginx files I then had to use all lowercases for the domain name for the server_name.
Step 4. Port forwarding to test non-reverse proxy server setup
Challenges in this section
Access your router application.
Often times you can access yours by going to your web browser and typing in the 192.168.1.1 and then typing in your credentials.
Know your credentials for your router application. If you do not know them contact your internet service provider. There is a good chance you are using a router they provided. You could also try some generic credentials like “admin” for username and “password” for the password. Since you need to be on the network to access it this might not be that highly protected.
Here is a video that looks pretty simple for a Verizon router https://www.youtube.com/watch?v=1SB6hycpNR8. The video at 0:54 shows a dashboard that is similar to the one I’ve pasted above but for their router.
Accessing your router might sound a bit intimidating at first but its actually pretty straight forward after you learn to navigate your router application.
While your router app will most likely be different, there should similarities in what you will see. There should least a entry box for the local IP address of the machine you want to forward to. Also, and entry box to enter which port the traffic will go to. Mine shows three entry boxes but as soon as I type in for one, the other two get filled in with the same number.
Here is how I set up my router to direct the traffic to the DevelopmentServer (local IP address 192.168.1.136). I live in France so my example will have French labels.
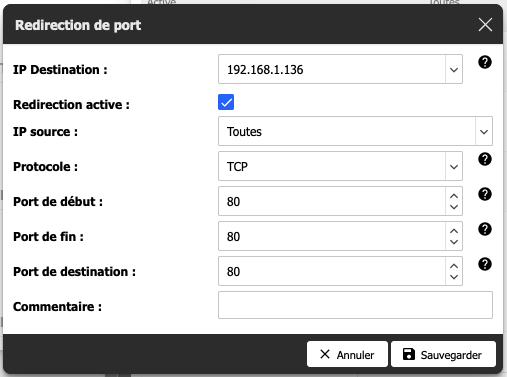 Illustration
3: Router Port Forwarding
to DevelopmentServer machine
Illustration
3: Router Port Forwarding
to DevelopmentServer machineI enter the local IP address in the destination. so that all the 80 traffic goes to it.
At this point if you set up your router to direct traffic to the Production or Development machine you should be able to see the website. This will not be using the reverse proxy server, which we have not set up yet, but this is a more typical scenario if you have only one machine.
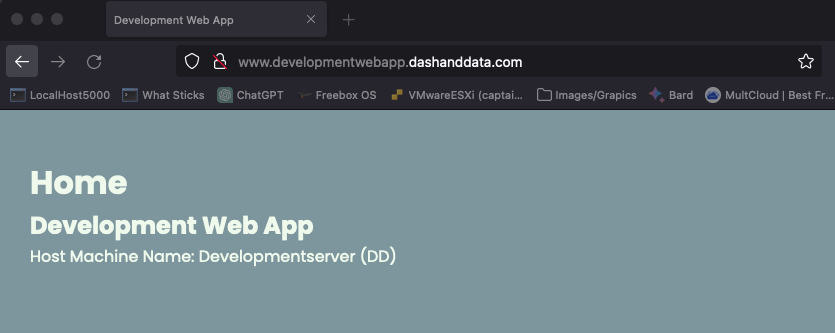
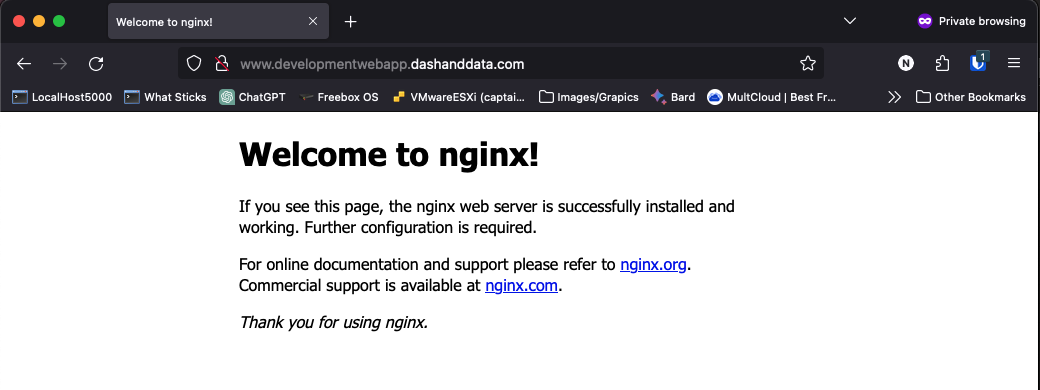
Illustration 4 is what the website looks like if everything is working correctly. The webpage shows up with no errors and the CSS is correctly directed by the location /static blocks. You can tell the CSS is correctly set up because of the color and font.
 Illustration
4: Development Web App
running from the Development Server (no ssl and no reverse proxy
server)
Illustration
4: Development Web App
running from the Development Server (no ssl and no reverse proxy
server)There is still not SSL you can tell on my browser because of the little man with the red slash between him. I added an orange arrow pointing to it in Illustration 5. This can be fixed by using certbot very easily so you can have your url accessed by HTTPS encryption which will make your site more secure and more accessible.
 Illustration
5: Not SSL Secure
Illustration
5: Not SSL Secure
Troubleshooting notes
If you get a screen like Illustration 6, it means is the app is not running or there is an error on your website.
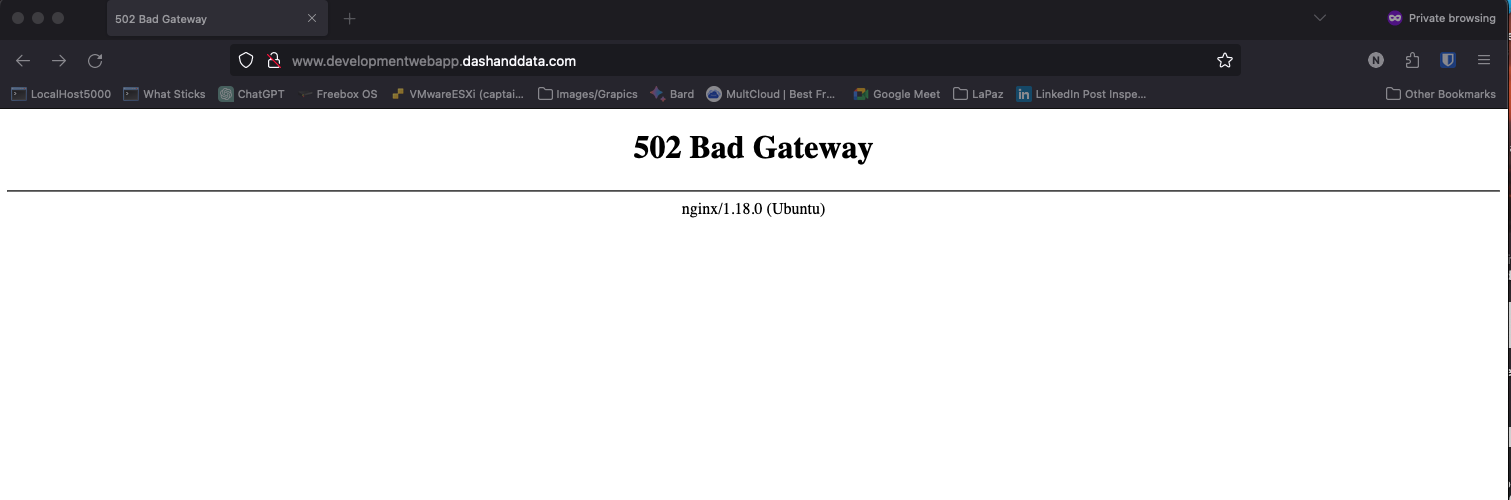 Illustration
6: Website error or website
not running
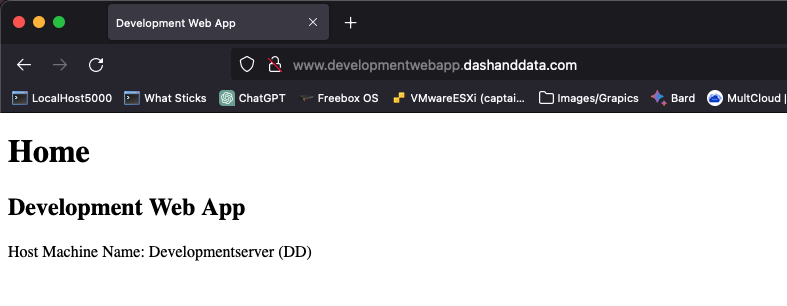
Illustration
6: Website error or website
not runningIf you don’t see any of the CSS it might mean you have your location block in your Nginx file incorrectly assigned. Illustration 7 shows what this looks like for me. There is no color and the font is the default. Compare this to Illustration 4 to see what it should look like.
 Illustration
7: Nginx location block
mis-assigned
Illustration
7: Nginx location block
mis-assignedIllustration 8 is what your site might look like if you have the Server block mis-assigned:
 Illustration
8: Nginx error due to
server_name mis-assigned
Illustration
8: Nginx error due to
server_name mis-assignedThe error here is my developmentwebapp.dashanddata.com.conf file has this row:
server_name Developmentwebapp.dashanddata.com;
The problem is the capital letters. It seems Nginx is caps sensitive, and my domain name always converts to lower case letters. Instead, it should look like this:
server {
    listen       80;
    listen       [::]:80;
    server_name  www.developmentwebapp.dashanddata.com;
    client_max_body_size 30G;

    location /static {
        alias /home/dashanddata_user/applications/DevelopmentWebApp/app_package/static;
    }

    location / {
        proxy_pass http://localhost:8000;
        include /etc/nginx/proxy_params;
        proxy_redirect off;
    }
}
I am going to make the Production app and run it also to make sure it runs ok before I set up the reverse proxy server on Machine01.
Once these are running and you can see them by setting the port forwarding rules on your router directly to each machine, then you can set up your Reverse Proxy server. After the reverse proxy server is set up you can you change the port forwarding rules and the two websites should be visible.
The take-away here is that the servers actually hosting the apps can be set up just as if they were the public facing server except for the SSL certificates. The reverse proxy server (Machine01) will just sit in front of them with Nginx files configured to direct the traffic to the appropriate server based on the url the client uses.
The only thing that will change from this set up is on the router when you have Machine01 set up. Then you’ll change the port forwarding rules to go to Machine01.
Step 5 Setup Machine01 (reverse proxy server)
This server does not need to be very powerful. Here are some of the specifications for Machine01:
CPU: 1
RAM: 2GB
Disk Space: 20GB
On this machine I also run a Python Flask Website that I use for all my servers to help me access diagnostics, like the syslog which I go to often to find errors.
So let’s start by getting this machine running. For this tutorial I will call this NWS-Conductor.
Here are a checklist of things that I do to get this machine to where we need it to be:
sudo apt update
sudo apt install nginx -y
install ufw and set up the rules
sudo ufw allow ssh
sudo ufw allow ‘Nginx full’
sudo ufw enable
sudo apt install certbot python3-certbot-nginx -y
Step 6 Create the Nginx Files on Machine01
Once this machine is running we’ll need to set up the Nginx files.
Prepare your nginx files like I have below and move the files to the /etc/nginx/sites-available directory.
Here is the one for the developmentwebapp:
server {
    listen 80;
    server_name www.developmentwebapp.dashanddata.com;
    client_max_body_size 1G;

    location / {
        proxy_pass http://192.168.1.136:8000;
        proxy_set_header Host $host;
        proxy_set_header X-Real-IP $remote_addr;
        proxy_set_header X-Forwarded-For $proxy_add_x_forwarded_for;
        proxy_set_header X-Forwarded-Proto $scheme;
        proxy_read_timeout 600s;  # Sets the timeout to 600 seconds
    }

    location /static {
        proxy_pass http://192.168.1.136:8000/static;
        proxy_set_header Host $host;
        proxy_set_header X-Real-IP $remote_addr;
        proxy_set_header X-Forwarded-For $proxy_add_x_forwarded_for;
        proxy_set_header X-Forwarded-Proto $scheme;
        proxy_read_timeout 600s;  # Sets the timeout to 600 seconds
    }
}
Here is the one for the productionwebapp:
server {
    listen 80;
    server_name www.productionwebapp.dashanddata.com;
    client_max_body_size 1G;

    location / {
        proxy_pass http://192.168.1.18:8000;
        proxy_set_header Host $host;
        proxy_set_header X-Real-IP $remote_addr;
        proxy_set_header X-Forwarded-For $proxy_add_x_forwarded_for;
        proxy_set_header X-Forwarded-Proto $scheme;
        proxy_read_timeout 600s;  # Sets the timeout to 600 seconds
    }

    location /static {
        proxy_pass http://192.168.1.18:8000/static;
        proxy_set_header Host $host;
        proxy_set_header X-Real-IP $remote_addr;
        proxy_set_header X-Forwarded-For $proxy_add_x_forwarded_for;
        proxy_set_header X-Forwarded-Proto $scheme;
        proxy_read_timeout 600s;  # Sets the timeout to 600 seconds
    }
}
Next you’ll need to create a link to the /etc/nginx/sites-enabled/ directory. Here is the syntax for that:
sudo mv developmentwebapp.dashanddata.com /etc/nginx/sites-available/
sudo mv productionwebapp.dashanddata.com /etc/nginx/sites-available/
sudo ln -s /etc/nginx/sites-available/developmentwebapp.dashanddata.com /etc/nginx/sites-enabled/
sudo ln -s /etc/nginx/sites-available/productionwebapp.dashanddata.com /etc/nginx/sites-enabled/
Then you can test that the nginx files are correctly formatted by using:
sudo nginx -t
Then reload nginx
sudo systemctl reload nginx
Troubleshooting notes
I added the location /static block because on some of my websites the CSS was not loading. It was only one. It had a domain extension of .info and I’m not sure if that has anything to do with it but now I know that if I have CSS on the app and I want to make sure the reverse proxy correctly directs the traffic I need to add a location /static block to the website directing it to the port on the right machine.
Step 7 Set up your router port forwarding rules
Once in my router app, I change the port forwarding rule from what I had before to the direct traffic to port 80 of Machine01.
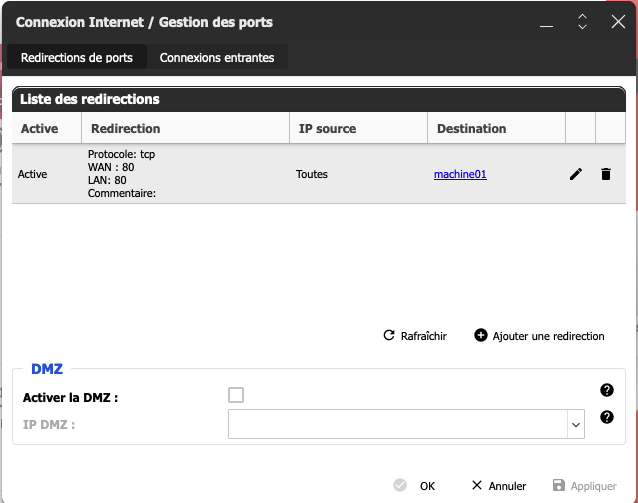 Illustration
9: Router port forwarding
to Machine01 (reverse proxy server)
Illustration
9: Router port forwarding
to Machine01 (reverse proxy server)You can see “machine01” in blue. That is because the router recognizes the name of the machine but when I click on the little pencil to the right I can actually select from all the other computers connected to the router. Your router app probably works the same way, but if not then just type in the correct local IP which in my case here would be 192.168.1.133 for Machine01.
Troubleshooting notes
If you get to this point and find you have a 502 bad gateway, one reason could be your Machine01 nginx files are not forwarding to the local IP address. Go back to Step 6 Create the Nginx Files on Machine01 and check the Nginx files.
In Conclusion
I am personally using this process for my own startup. I have used Nginx for a few years now. I am currently using this set up that we will go through in this article, therefore, I know if works.
If you run into trouble feel free to reach out.
Also, if you have any suggestions for best practices I would love to know so please share in comments or message me directly.